SCADA Software
ATSCADA Project Deployment Guide: Create and Run Projects on Another Computer
ATSCADA Project Deployment is an essential process for transferring a completed SCADA project from the development computer to another runtime computer. This allows users to design, configure, and test the system on one machine, then deploy it smoothly to a client computer for real-world operation.
In this guide, you will learn how to create an ATSCADA project, deploy it to another computer, and perform MySQL database backup and restore for full project migration.
What Is ATSCADA Project Deployment?
ATSCADA Project Deployment refers to the process of moving an ATSCADA project from the design environment to a runtime machine. It includes:
- Building the project on the development PC
- Installing required ATSCADA runtime packages
- Configuring ATDriver Server or OPC Server
- Migrating MySQL database settings
- Running the project executable on the client computer
This ensures the deployed system works exactly like the original development setup.
ATSCADA Project Creation Process
Creating a project in ATSCADA begins on the design computer, where all engineering, programming, and interface development are completed.
The project is then compiled and prepared for deployment to another machine.
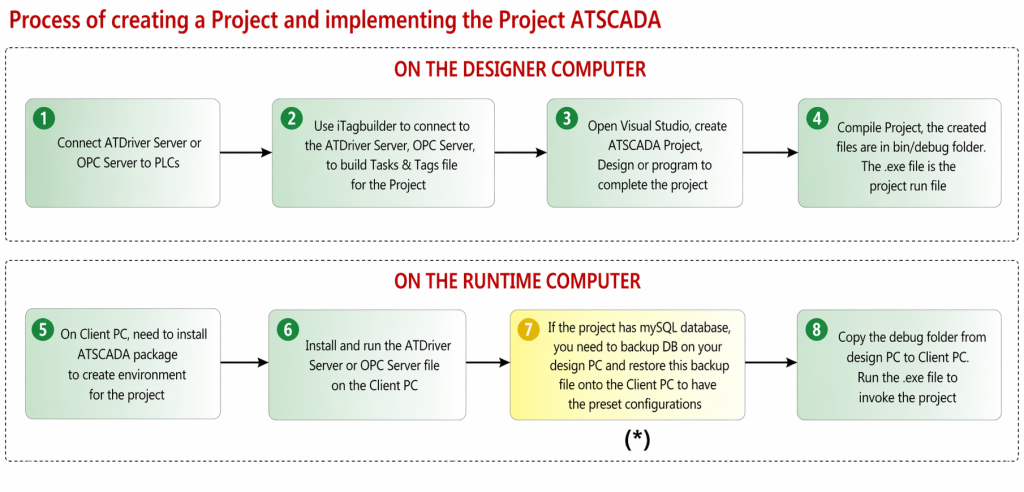
Detailed Steps for ATSCADA Project Deployment
Phase 1: On the Design Computer
Step 1: Connect ATDriver Server or OPC Server to PLCs
First, connect your PLC devices to ATDriver Server or any supported OPC Server. This enables communication between field devices and the ATSCADA software.
Step 2: Use iTagBuilder to Create Task & Tag Structure
Launch iTagBuilder and connect it to the configured ATDriver Server or OPC Server.
Use this tool to build:
- Task structures
- Tag databases
- Variable mappings for the project
This is a critical part of ATSCADA Project Deployment, as all runtime data points depend on proper tag configuration.
Step 3: Open Visual Studio and Create the Project
Open Visual Studio, then create a new ATSCADA Project using custom Windows Forms components.
At this stage, users can:
- Design HMI screens
- Configure alarms
- Build reports
- Write automation logic
- Complete application programming
Step 4: Build the Project
After finishing development, build the project.
Usually, the output files are located in:
The main .exe file is the runtime executable used during ATSCADA Project Deployment.
Phase 2: On the Runtime Computer (Client PC)
Step 1: Install ATSCADA Package
Install the full ATSCADA runtime package on the client machine. This creates the required environment for running the deployed project.
Step 2: Install and Run ATDriver Server or OPC Server
Install the same communication server used on the development machine:
- ATDriver Server
- OPC Server
Then run the configuration file to reconnect PLC devices.
Step 3: Restore MySQL Database (If Used)
If your project uses a MySQL database, you need to migrate the database from the design PC to the runtime PC.
This preserves:
- Historical data settings
- User accounts
- Alarm configurations
- Reports setup
- Project parameters
Step 4: Copy Debug Folder and Run Project
Copy the entire Debug folder from the project directory to the runtime machine.
Then launch the .exe file to start the system.
This completes the ATSCADA Project Deployment process.
Backup & Restore MySQL Database for ATSCADA Project Deployment
Database migration is an important part of ATSCADA Project Deployment when using MySQL
. 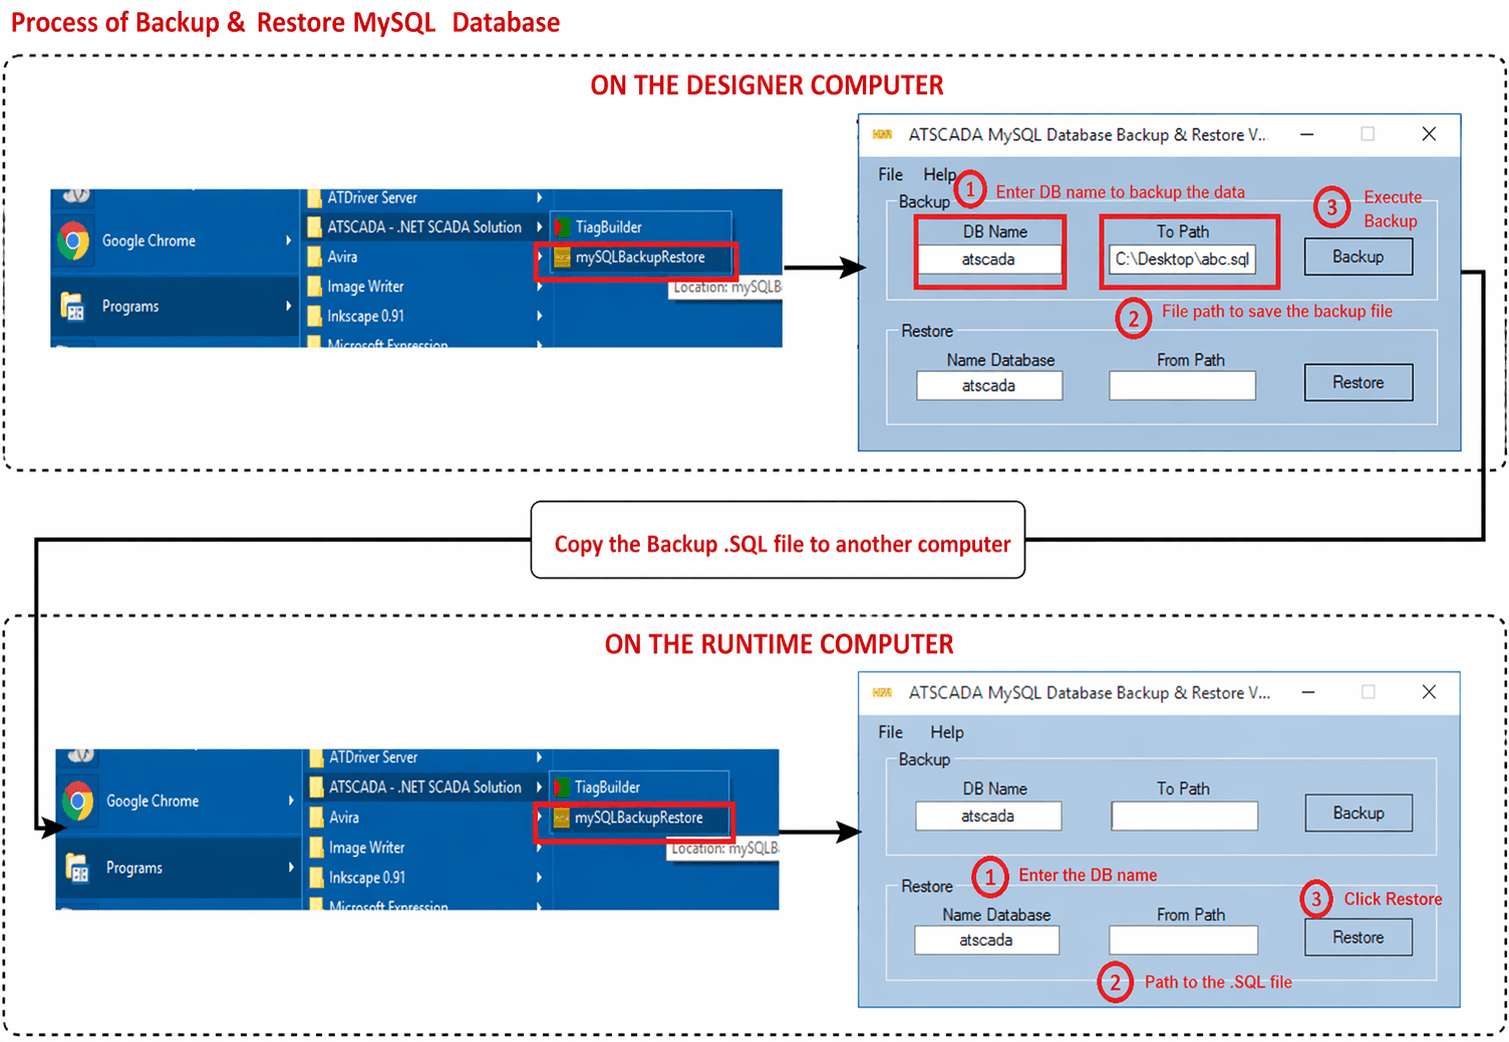
Phase 1: On the Design Computer (Backup)
Open Backup Tool
Go to the Start Menu, then open:
ATSCADA – .NET SCADA Solution
Launch the tool named mySQLBackupRestore.
Backup Steps
Step 1: Enter Database Name
In the DB Name field, enter the database name.
Example: atscada
Step 2: Select Backup Path
In the To Path field, choose where to save the backup file.
Example: Desktop/abc.sql
Step 3: Click Backup
Press Backup to create the SQL backup file.
Transition Step
Copy the generated .SQL backup file from the design computer to the runtime computer.

Phase 2: On the Runtime Computer (Restore)
Open Restore Tool
Open mySQLBackupRestore from the installed ATSCADA package.
Restore Steps
Step 1: Enter Database Name
In the Name Database field, enter the target database name.
Example: atscada
Step 2: Select SQL File
In the From Path field, browse to the copied .SQL file.
Step 3: Click Restore
Press Restore to recover the full database.
This ensures your ATSCADA Project Deployment includes all original settings and configurations, with options for secure industrial data management.
Benefits of ATSCADA Project Deployment
Following the correct deployment process provides many advantages:
- Fast migration to another computer
- Stable runtime operation
- Easy database transfer
- Reusable project structure
- Reliable PLC communication
- Professional industrial system setup
Best Practices for ATSCADA Project Deployment
To avoid deployment issues, follow these recommendations:
- Use the same software version on both computers
- Verify PLC communication settings
- Backup MySQL before migration
- Test the executable file after deployment
- Keep project folders secure
- Activate licenses if required
Conclusion
ATSCADA Project Deployment is the key process for transferring a SCADA project from the engineering computer to a runtime machine. By following the correct steps for project creation, file transfer, communication setup, and database restoration, users can deploy industrial automation systems quickly and efficiently.
Whether you are building a new SCADA system or moving an existing project, ATSCADA provides the tools needed for successful deployment.
👉 Learn More about SCADA Software

ATSCADA - Smart SCADA Software with AI Predictor & Blockchain. ATSCADA is an advanced SCADA software platform for real-time monitoring, intelligent control, and efficient data acquisition. It is ideal for Industrial IoT (IIoT), smart cities, integrated automation systems, and Agriculture 4.0. With a built-in AI Predictor, ATSCADA enables predictive analytics to detect issues early, optimize performance, and reduce downtime. The integration of Blockchain technology ensures secure, transparent, and tamper-proof data management. Highly scalable and easy to integrate, ATSCADA is trusted by businesses to enhance productivity, strengthen cybersecurity, and accelerate digital transformation.
Related articles
ATSCADA iStreamCameraTools – Industrial IP Camera Integration and Real-Time Video Monitoring
The iStreamCameraTools toolkit enables the connection of ONVIF-compatible cameras to receive camera streams and display [...]
Jun
OPC Server Connection Guide
Overview The ATSCADA ecosystem provides exceptional flexibility for integrating data from third-party OPC Servers (such [...]
Jun
Common ATSCADA Errors and How to Fix Them – FAQ for ATSCADA Tools and Systems
Issues Related to ATDriverServer & iTagBuilder Software Why Does ATDriverServer Not Open? There are two [...]
May
ATSCADA Hospital Temperature and Humidity Monitoring Alarm System Project
Requirements: The system includes three monitoring areas: the pharmacy, inpatient warehouse, and cold storage, following [...]
May
ATSCADA CookBook: Complete Guide to System Architecture, Tools, Installation & Troubleshooting
The ATSCADA Training book is an essential navigation structure that helps users access all major [...]
Apr
ATSCADA Power Management System
Requirements: There are 3 areas that require power management, including a factory, a residential zone, [...]
Apr