SCADA Software
ATSCADA IWebAPI Tools – Web API Integration Tools for Modern SCADA Systems
The ATSCADA IWebAPI toolset is designed to retrieve data from ATDriver Server and expose it through APIs, allowing external systems to access and use the data flexibly and efficiently, while supporting file exchange through ATSCADA iFtp.
System Preparation and Installation
Step 1: Install the iWebAPITools Package
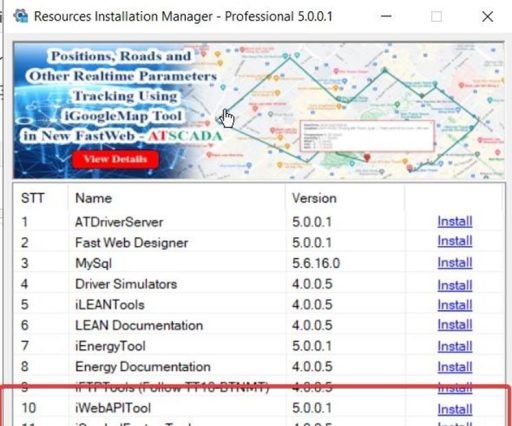
- Open the Resources Installation Manager software.
- Find iWebAPITools (Version 5.0.0.1).
- Click the Install button.
- When the setup window appears, click Install → Finish to complete the installation of ATSCADA IWebAPI.
Step 2: Configure ATDriver Server (Create Data Tags)
This is a very important step to create the data source for calculation tools in ATSCADA IWebAPI.
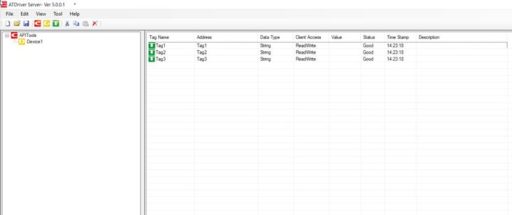
Open ATDriver Server. Go to File → New.
Add Channel: Name APITool, Driver select InternalMemory.all.dll.
Add Device: Name Device 1.
Create the following Tags (Data Type: String/Double):
- Tag1
- Tag2
- Tag3
Go to File → Save As and save the file as APITools.xml.
Step 3: Configure iTagBuilder
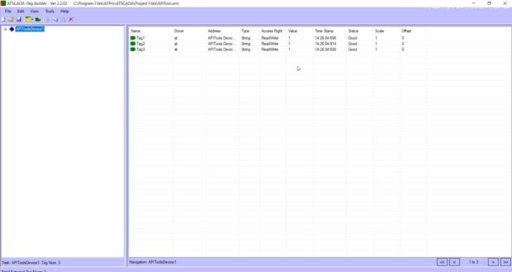
Open iTagBuilder. Select New → Yes.
At Driver Name, enter ATDriver. Click Add Driver, then select ATDriverClient.dll.
Enter the IP Address of the computer running Driver Server (for example: 192.168.1.122) or keep the default localhost. Click Connect.
Go to Tools → Import All. Select the Device and click OK.
Go to File → Project Register, save the file name, and click Yes to register tags into the ATSCADA IWebAPI system.
Interface Design in Visual Studio
Step 4: Integrate iWebAPITools into Toolbox
Open Visual Studio and create a Windows Forms App (.NET Framework) project.
On the Toolbox panel, right-click and select Add Tab, then name it ATSCADA iWebAPITools.
Right-click the newly created tab and select Choose Items…
Click Browse, then navigate to the installation path:
C:\Program Files\ATPro\ATSCADA\iWebAPITools\iWebAPITools.dll
Click OK. The tool icons of ATSCADA IWebAPI will appear in the Toolbox.
Add Reference
- In the Solution Explorer window, right-click References → Select Add Reference…
- Click Browse and navigate to the ATSCADA installation folder: C:\Program Files\ATPro\ATSCADA
- Select the file Microsoft.Owin.Host.HttpListener.dll → Click Add → Click OK for ATSCADA IWebAPI integration.

Detailed Guide to ATSCADA IWebAPI Tools
Important Note: Always drag the iDriver tool onto the Form before using any other tools.
iWebAPI Tool
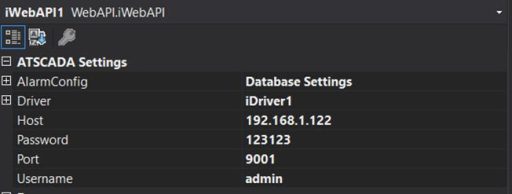
- Description: Drag iWebAPI onto the Form.
- Configuration Properties:
- Driver: Select iDriver1.
- Host: Enter the IP address of the running computer (for example: 192.168.1.122 or localhost).
- Port: Set the port (for example: 8000 or 9000).
- Username: Set the login username (for example: admin).
- Password: Set the login password (for example: 123456).
- Test API with Postman:
Postman is a professional tool used to test API endpoints, including functions such as GET, POST, and more for ATSCADA IWebAPI.
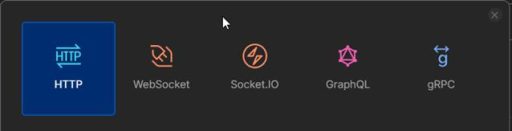
Open Postman, then on the main interface select New.

Select HTTP
On the right interface, select the POST method and enter the API endpoint address based on the configuration previously set in iWebAPI: 192.168.1.122:9001/api/atscada/login.
Then switch to the Body tab, select raw, and choose JSON format.
After selecting these options, you will get the result as shown in the image below.
In the section below, enter the JSON file structure as illustrated for ATSCADA IWebAPI.
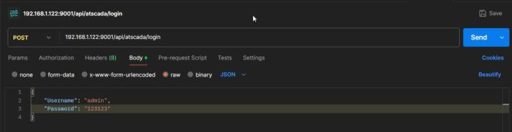
Sample JSON:
{
“Username”: “admin”,
“Password”: “123123”
}
Click Send to call the configured API endpoint. If successful, a token string will be returned in the Body tab below for ATSCADA IWebAPI.
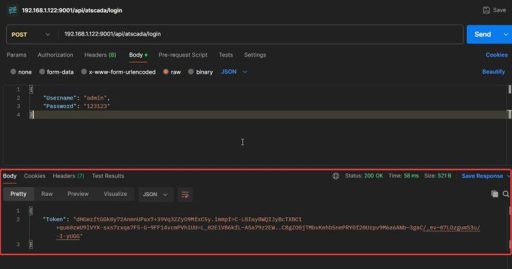
This Token string is used to authenticate users when calling the API.
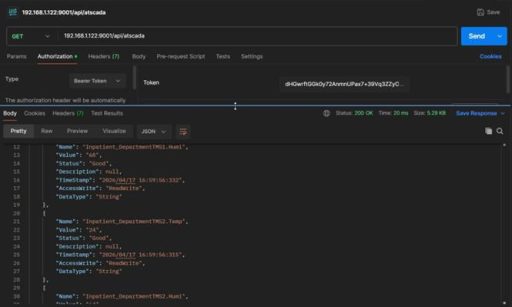
After obtaining the Token, we will test the GET method to retrieve registered values from ATDriver Server using ATSCADA IWebAPI.
Change the method from POST to GET and update the API syntax as follows:
192.168.1.122:9001/api/atscada
Then switch to the Authorization tab. Select Bearer Token as the Type, and paste the Token string obtained in the previous step into the Token field.
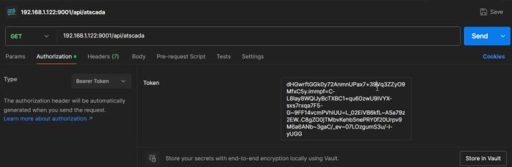
Then click Send to call the API endpoint. If successful, you will receive all data of the TagName values previously configured in ATDriver Server through ATSCADA IWebAPI, which can be used for AI time series forecasting.
 .
.👉 Learn More about SCADA Software

ATSCADA - Smart SCADA Software with AI Predictor & Blockchain. ATSCADA is an advanced SCADA software platform for real-time monitoring, intelligent control, and efficient data acquisition. It is ideal for Industrial IoT (IIoT), smart cities, integrated automation systems, and Agriculture 4.0. With a built-in AI Predictor, ATSCADA enables predictive analytics to detect issues early, optimize performance, and reduce downtime. The integration of Blockchain technology ensures secure, transparent, and tamper-proof data management. Highly scalable and easy to integrate, ATSCADA is trusted by businesses to enhance productivity, strengthen cybersecurity, and accelerate digital transformation.
Related articles
ATSCADA iStreamCameraTools – Industrial IP Camera Integration and Real-Time Video Monitoring
The iStreamCameraTools toolkit enables the connection of ONVIF-compatible cameras to receive camera streams and display [...]
Jun
OPC Server Connection Guide
Overview The ATSCADA ecosystem provides exceptional flexibility for integrating data from third-party OPC Servers (such [...]
Jun
Common ATSCADA Errors and How to Fix Them – FAQ for ATSCADA Tools and Systems
Issues Related to ATDriverServer & iTagBuilder Software Why Does ATDriverServer Not Open? There are two [...]
May
ATSCADA Hospital Temperature and Humidity Monitoring Alarm System Project
Requirements: The system includes three monitoring areas: the pharmacy, inpatient warehouse, and cold storage, following [...]
May
ATSCADA CookBook: Complete Guide to System Architecture, Tools, Installation & Troubleshooting
The ATSCADA Training book is an essential navigation structure that helps users access all major [...]
Apr
ATSCADA Power Management System
Requirements: There are 3 areas that require power management, including a factory, a residential zone, [...]
Apr